
To effectively frame mountains, cityscapes, and water bodies, focus on natural and architectural features to create balance and depth. Use the rule of thirds, leading lines, and vantage points to guide viewers’ eyes toward key elements. Incorporate foregrounds, reflections, and layers to add dimension, while positioning water and landmarks to frame scenes beautifully. By understanding perspective and composition techniques, you can craft compelling visuals—discover more ways to perfect your view alignment as you continue.
Key Takeaways
- Use natural features like trees, water, or architectural elements to frame scenes and create visual boundaries.
- Match edges, centers, or points between views to establish a coherent, connected composition.
- Apply the rule of thirds and leading lines to position key elements and guide viewer attention effectively.
- Incorporate foreground, middle ground, and background layers to add depth and dimension.
- Utilize water reflections and contours to enhance symmetry, guide focus, and create a sense of harmony.
landscape photography composition guide
As an affiliate, we earn on qualifying purchases.
As an affiliate, we earn on qualifying purchases.
Understanding the Basics of View Alignment

To understand view alignment, it is vital to grasp how different views are positioned relative to each other within an interface. View alignment ensures that elements like mountains, cityscapes, or water bodies are arranged logically and visually appealing. When you align views properly, you create a smooth flow that guides the viewer’s eye naturally across the scene. This involves matching edges, centers, or specific points between views so they appear connected and coherent. Proper alignment helps avoid awkward gaps or overlaps that can distract viewers. It’s about establishing a clear relationship between your visual elements, making the scene easy to interpret and aesthetically pleasing. Mastering view alignment allows you to craft more engaging, balanced compositions that communicate your intended perspective effectively.
tripod for landscape photography
As an affiliate, we earn on qualifying purchases.
As an affiliate, we earn on qualifying purchases.
The Role of Perspective in Scene Composition

Perspective plays a essential role in scene composition because it determines how viewers perceive depth, distance, and spatial relationships within your visual layout. By choosing the right perspective, you guide the viewer’s eye through the scene, emphasizing certain elements while minimizing others. For example, a low-angle perspective can make mountains appear towering and majestic, while a bird’s-eye view might showcase the cityscape’s layout. Adjusting perspective helps create a sense of scale and realism, making your scene more immersive. It also influences the emotional tone; a wide-angle view can evoke awe, while a close-up creates intimacy. Ultimately, understanding and manipulating perspective allows you to craft scenes that communicate your intended message and engage viewers effectively. Additionally, integrating rustic design elements can enhance the authenticity and charm of your scene, creating a cohesive visual story.
wide angle lens for cityscapes
As an affiliate, we earn on qualifying purchases.
As an affiliate, we earn on qualifying purchases.
Techniques for Framing Mountain Landscapes

Framing a mountain landscape effectively involves selecting the right elements to focus the viewer’s attention and create a compelling composition. Use natural features like trees, rocks, or water to serve as foreground anchors, guiding the eye into the scene. Employ the rule of thirds by placing key peaks or valleys along intersecting lines to enhance balance. Incorporate leading lines such as ridges or streams to draw viewers toward the main subject. Adjust your vantage point to include interesting foregrounds or layers that add depth. Consider framing the mountains with natural borders like arching branches or gaps in foliage to create a sense of enclosure. Finally, pay attention to light and shadow, which can emphasize textures and contours, transforming a simple scene into a striking mountain landscape. Developing an analytical thinking approach can help in assessing the interplay of elements within the scene to achieve optimal composition.
framing techniques photography book
As an affiliate, we earn on qualifying purchases.
As an affiliate, we earn on qualifying purchases.
Capturing Urban Skylines With Intentional Alignment

When capturing urban skylines, you should focus on framing the scene to highlight key structures and create a balanced composition. Precise alignment of landmarks helps guide the viewer’s eye and emphasizes the city’s unique features. By intentionally aligning elements, you can craft striking images that convey your vision clearly. Incorporating elements such as visual harmony can further enhance the overall impact of your photograph.
Framing City Skylines
Capturing the essence of a city skyline requires deliberate composition and thoughtful alignment. You want to choose an angle that highlights the most iconic buildings, ensuring they’re positioned to create balance and visual interest. Think about framing the skyline within natural or architectural elements—like trees, bridges, or waterfronts—that guide the viewer’s eye toward the city’s silhouette. Use the rule of thirds to place key structures off-center, adding dynamism to your shot. Pay attention to the horizon line; keep it level to avoid distraction. Consider how foreground elements can add depth, making the scene more immersive. With intentional framing, you emphasize the city’s character and create a compelling, visually striking image. Incorporating visual balance techniques will further enhance the overall composition and harmony of your photograph.
Aligning Landmarks Precisely
Aligning landmarks precisely is essential for creating a powerful and harmonious urban skyline photograph. You want the key buildings, towers, or bridges to line up intentionally, guiding the viewer’s eye across the image. Use a tripod and a level to verify your camera remains steady and aligned. Pay attention to the horizon line and vertical elements, making sure they run parallel to the edges of your frame. Incorporate foreground elements or reference points to check alignment, adjusting your position as needed. Subtle shifts can dramatically improve the overall balance of your shot. Remember, deliberate placement of landmarks creates a sense of order and purpose, transforming a simple cityscape into a compelling visual story. Precision in alignment emphasizes your artistic intent and elevates your urban photography. Additionally, understanding precious metals market trends can inform your choices when capturing cityscapes that feature modern or historic landmarks, adding an extra layer of insight to your composition.
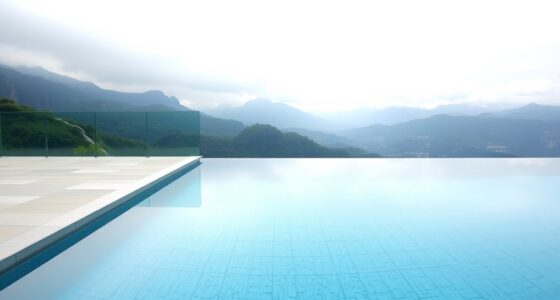
Water Bodies: Enhancing Serenity Through Framing

Water bodies create stunning reflective surfaces that amplify the sense of calm in your view. Using natural elements like trees or rocks as frames can highlight these tranquil scenes and add depth. By carefully positioning your focus, you can emphasize the water’s serenity as the main attraction. Incorporating contrast ratio considerations ensures the water’s reflections appear vivid and well-defined, enhancing the overall visual impact.
Reflective Surface Effects
Reflective surfaces created by water bodies can dramatically enhance the serenity of a scene by acting as natural mirrors. They capture the sky, mountains, or cityscape, doubling the visual impact and creating a sense of harmony. When you position yourself to see reflections clearly, the scene feels more balanced and immersive. Still waters like lakes or calm rivers provide perfect mirrors, emphasizing tranquility. Reflections can also introduce symmetry, drawing the viewer’s eye and guiding the gaze through the composition. By paying attention to the angle of light and your vantage point, you can maximize the clarity and beauty of these reflections. Using the appropriate headphone connection can help you listen to ambient sounds or music that enhance your appreciation of nature’s reflective beauty. This effect not only deepens the visual appeal but also evokes a peaceful, contemplative mood, enriching your overall view.
Natural Frame Opportunities
Have you ever noticed how natural frames formed by water bodies can draw your eye directly to a scene’s focal point? Lakes, rivers, and ponds often create borders that guide your gaze inward. For example, overhanging branches or reeds near the shoreline act as organic frames, leading your eyes toward distant mountains or cityscapes. These water-based frames add a sense of depth and tranquility, emphasizing the scene’s serenity. By positioning your view to include these natural borders, you enhance the composition’s harmony. Water bodies not only reflect the surroundings but also serve as visual guides, subtly directing attention. Utilizing the principles of visual perception and natural framing techniques, using the natural contours of lakes or the winding curves of rivers as framing elements creates a peaceful, engaging experience, inviting viewers to explore the scene more fully.
Focal Point Emphasis
By framing scenes with water bodies, you naturally guide the viewer’s eye toward the main focal point. Water reflects light and adds depth, making your subject stand out. To emphasize your focal point effectively, consider these strategies:
- Use leading lines created by shoreline curves or ripples to draw attention directly to your main feature.
- Position the water body so it frames or borders your subject, creating a natural visual corridor.
- Adjust the angle or perspective to ensure reflections or water movement highlight your focal point without distraction.
- Incorporate visual hierarchy principles to balance water elements with the main subject, ensuring clarity and focus.
These techniques help create a sense of tranquility and focus. When water acts as a framing device, it not only enhances serenity but also directs the viewer’s gaze precisely where you want it.
Using the Rule of Thirds to Balance Elements

Ever wondered how to create a balanced and visually appealing composition? The Rule of Thirds is your go-to technique. Imagine dividing your frame into nine equal parts with two horizontal and two vertical lines. Place key elements along these lines or at their intersections to create harmony. For example, position a mountain peak on one of the top intersection points, or align a city skyline along a vertical line. This approach guides the viewer’s eye naturally through your scene, avoiding cluttered or awkward compositions. By balancing elements across these grid points, you draw attention to the main subjects while maintaining overall harmony. Understanding visual composition is essential for crafting compelling images. Remember, the goal is to keep your shot lively and engaging without overwhelming the viewer. The Rule of Thirds helps you achieve a compelling, well-balanced image effortlessly.
Creating Depth and Dimension in Your Shots

Building on the principles of composition, creating depth and dimension in your shots involves more than just placing elements thoughtfully. To achieve this, consider these techniques:
Enhance your photos with layers, overlapping elements, and varied perspectives to add depth and realism.
- Use foreground, middle ground, and background layers to add visual depth.
- Incorporate overlapping elements so objects appear connected and spatially related.
- Play with perspective by changing your camera angle, such as shooting from a low or high vantage point.
These methods help your images feel more three-dimensional, drawing viewers into the scene. By thoughtfully arranging elements and experimenting with angles, you create a sense of space and realism that elevates your photography. Remember, depth isn’t just about distance—it’s about guiding the viewer’s eye through your composition.
Leading Lines and Visual Pathways

Leading lines and visual pathways are powerful tools to guide the viewer’s eye through your photograph. They create a natural flow, drawing attention to key elements and leading the viewer deeper into the scene. Roads, rivers, fences, and architectural features often serve as strong lines that direct gaze. When you position these lines thoughtfully, they can emphasize perspective and depth, making your composition more engaging. Use converging lines to create a sense of movement or focus, and consider their placement within the frame to balance the scene. Avoid cluttered backgrounds that distract from the lines themselves. Instead, keep your lines clear and prominent, guiding the viewer smoothly from the foreground to the background, ensuring they stay engaged with the story your image tells.
Balancing Natural and Man-Made Features

How can you create a harmonious composition by balancing natural and man-made features? First, consider the placement of structures so they complement rather than compete with the landscape. Second, use scale and proportion to ensure buildings or objects don’t overpower natural elements. Third, refine your framing to highlight the relationship between the two, creating a sense of unity. Focus on integrating features seamlessly—such as positioning a bridge to connect water and cityscapes or placing trees near buildings to soften harsh lines. By paying attention to how natural and man-made elements interact within your view, you guide the viewer’s eye smoothly across the scene. This balance emphasizes the beauty of both, resulting in a more engaging, cohesive composition.
Tips for Experimenting With Different Viewpoints

Experimenting with different viewpoints can dramatically enhance the harmony between natural and man-made features in your composition. Try shifting your perspective—stand higher, lower, or move laterally—to find new ways to frame your scene. Use foreground elements to create depth or look for reflections that add layers. Changing angles can reveal hidden details or emphasize specific features, making your shot more dynamic. To inspire your experimentation, consider this table:
| Viewpoint | Effect | Tip |
|---|---|---|
| High vantage point | Expands scene, adds grandeur | Use a ladder or drone for height |
| Eye level | Creates intimacy and balance | Keep backgrounds simple |
| Low angle | Emphasizes height and power | Place interesting foreground objects |
| Side angle | Adds depth, reveals texture | Shift laterally for unique framing |
Keep experimenting until you find the viewpoint that best captures your scene.
Frequently Asked Questions
How Does Lighting Influence View Alignment in Landscape Photography?
Lighting plays a vital role in view alignment because it highlights key elements and guides the viewer’s eye. You should shoot during golden hour to create warm, soft light that enhances textures and depth, or use shadows to add contrast and dimension. By adjusting your angle and timing, you guarantee the lighting complements the landscape, emphasizing your focal points and creating a balanced, visually appealing composition.
What Equipment Is Best for Capturing Precise Scene Framing?
Think of your camera as a painter’s brush, guiding your eye to the perfect composition. Use a sturdy tripod to steady your shot, ensuring sharpness and precision. A level is like a compass, helping you align horizons flawlessly. A zoom lens lets you zoom into details or frame wide vistas, while a tilting LCD screen lets you see your scene from different angles. Together, they make your scene come alive with clarity and balance.
How Can Weather Conditions Affect View Alignment Accuracy?
Weather conditions can considerably impact your view alignment accuracy. When it’s foggy, rainy, or windy, visibility drops, making it harder to precisely align your shot. Wind can shake your camera, causing misalignment, while rain and fog obscure your subject, reducing sharpness and detail. To counter these effects, you need to stabilize your equipment, use weather-resistant gear, and plan your shoot during clearer weather to guarantee accurate framing.
Are There Cultural Considerations When Framing Certain Landscapes?
Cultural considerations can profoundly shape how you frame certain landscapes. You might want to respect local traditions, beliefs, and sensitivities, ensuring your framing honors these cultural contexts. For example, avoid framing sacred sites in ways that could offend or misrepresent their significance. By paying attention to local lore and customs, you create a respectful, relevant, and resonant representation, fostering understanding and appreciation for the landscape’s cultural importance.
How Does Post-Processing Impact the Integrity of View Alignment?
Post-processing can profoundly impact the integrity of view alignment if you’re not careful. When you edit images, you might unintentionally distort or skew elements, making the scene look unnatural or misaligned. To maintain authenticity, always check your edits against the original composition, use subtle adjustments, and avoid overdoing perspective corrections. This way, you preserve the scene’s true structure and keep the view alignment intact.
Conclusion
When you master view alignment, you tap into a powerful tool that shapes how viewers experience scenes. Some believe that perfect framing can evoke emotions and tell stories without words. By experimenting with perspectives and balancing natural and urban elements, you can create compelling images. Remember, even the most chaotic landscapes become harmonious when aligned intentionally—proving that a well-placed shot isn’t just luck, but a deliberate act of visual storytelling.