TL;DR
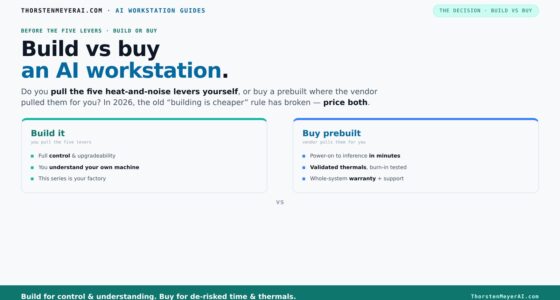
The best way to control noise in a closet studio isn’t just foam — it’s about strategic placement, layered treatment, and venting. Moving your rig into another room often beats endless absorption efforts, especially when heat and noise are managed properly.
Ever tried recording vocals or streaming in a tiny closet? It’s a wild mix of echo, boxiness, and noise bouncing around. But here’s the kicker: most people waste money on foam panels when the real solution starts with placement. Moving your rig out of your main space or sealing gaps in the door can cut noise by 80%, making everything else just icing on the cake. You can learn more about acoustic dampening, placement, and the “rig in the closet” setup to optimize your space. This guide is about understanding how to dampen sound effectively, where to put your treatment, and how a ‘rig in the closet’ can be your best friend — if you handle heat and airflow right.
Forget the myth that only expensive foam can make your space usable. It’s all about layered solutions: placement, absorption, and ventilation. Whether you’re building a vocal booth or just trying to stop echo, knowing where and how to treat your closet makes all the difference. Ready to turn that tiny space into a pro-grade studio? Let’s dive in.
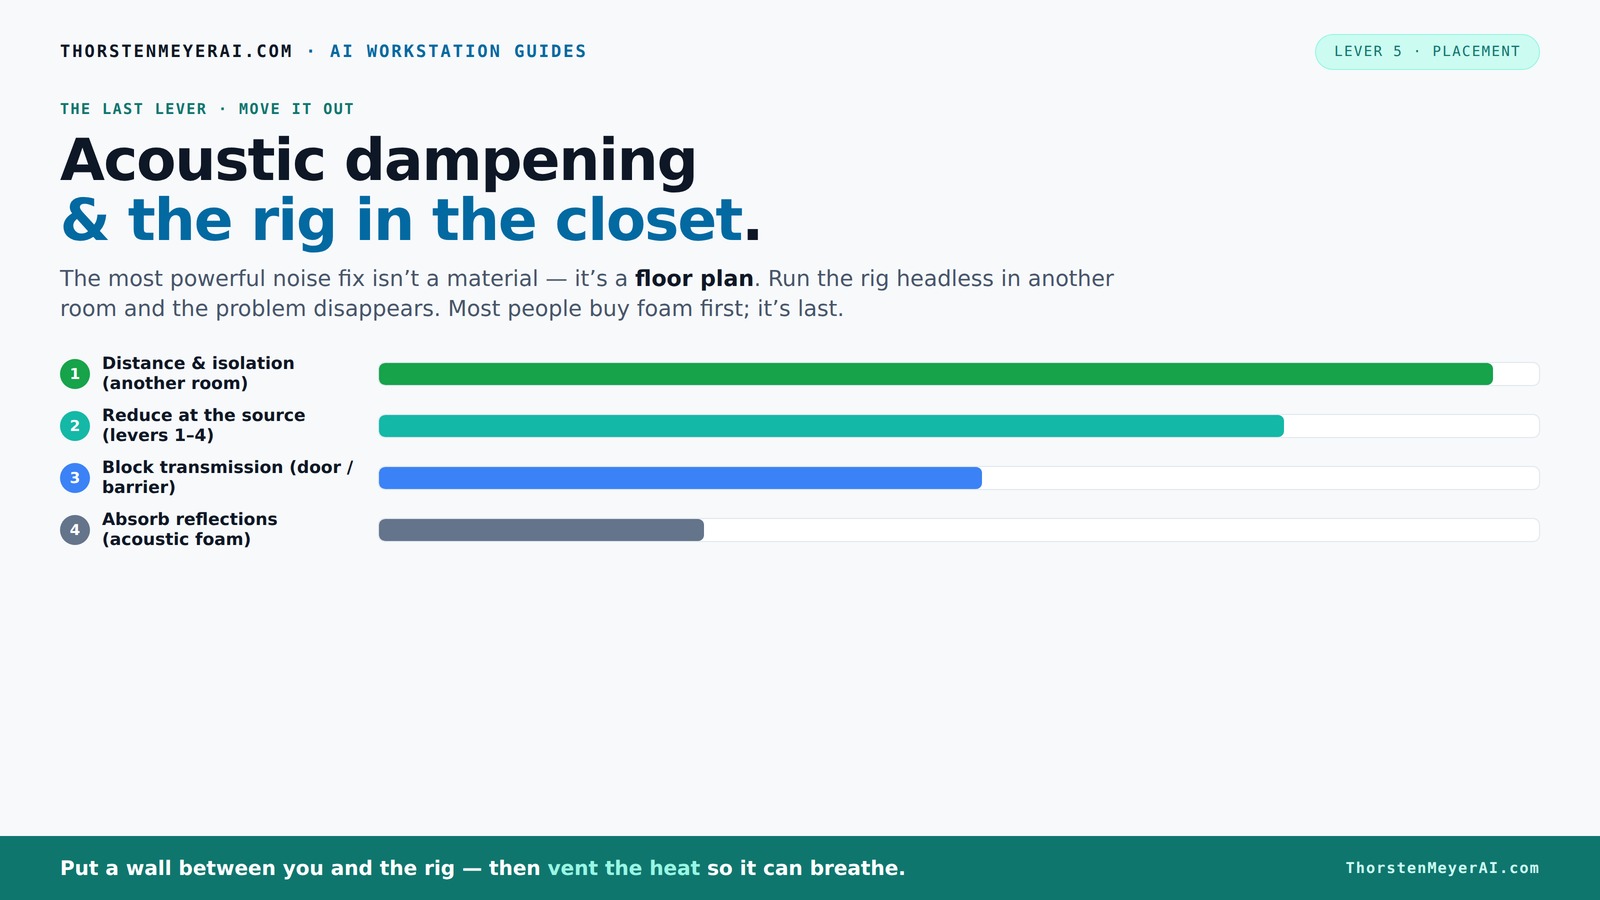
Acoustic dampening
& the rig in the closet.
The most powerful noise fix isn’t a material — it’s a floor plan. A rig you can’t hear because it’s in another room beats any amount of foam. Tap the approaches in Part 1 to see what actually works.
(another room)
(levers 1–4)
(door / barrier)
(acoustic foam)
Contain the noise, not the heat
Key Takeaways
- Always prioritize moving your gear into a separate room or closet before adding absorption or soundproofing.
- Layer your solutions: use placement, absorption, sealing, and ventilation for best results.
- Control low-frequency buildup with bass traps, especially in small, parallel-walled closets.
- Seal gaps around doors, outlets, and vents — even tiny leaks can ruin your quiet space.
- In small spaces, focus on placement, layered treatment, and proper ventilation over just foam panels.

Focusound 52 Pack Acoustic Foam Panels 1" x 12" x 12" Sound Proof Foam Panles Soundproofing Noise Cancelling Wedge Panels for Home Office Recoding Studio with 300PCS Double-Side Adhesive
Soundproofing - Acoustic foam panels triangular grooves structure for better noise absorption, helps to reduce and absorb unwanted...
As an affiliate, we earn on qualifying purchases.
As an affiliate, we earn on qualifying purchases.
What 'Rig in the Closet' Means and Why It Works
A 'rig in the closet' means placing your powerful, noisy computer or audio setup inside a small, enclosed space to keep the noise away from your workspace. It’s a simple idea with big impact: your loud, heat-generating gear stays hidden, and you hear almost nothing. Think of it like a soundproof bunker for your machine, giving you silence while still running your AI models or recording vocals. The key? Proper airflow. Without it, heat builds up fast, turning your quiet closet into a sauna and your rig into a throttling, noisy beast.
Why does this matter? Because in small spaces, noise and heat can quickly become overwhelming, affecting your concentration, equipment longevity, and even your comfort. The tradeoff is airflow management; sacrificing some noise reduction for good ventilation is essential. If you neglect cooling, your equipment can overheat, leading to throttling, instability, or damage. Properly ventilated, a closet rig can be a quiet, efficient solution that keeps your main workspace free of clutter and noise while maintaining optimal performance.
For example, many creators set up their GPU rigs in a closet on a shelf or rack. They connect it via a wired network, so they can control and monitor it remotely. The result? You get the power you need, without the noise and heat in your main room. It’s a smart move for shared spaces, small apartments, or home studios where silence matters more than proximity.

33 Ft Gray Self-Adhesive Soundproofing Weather Stripping for Doors and Windows, 0.35" Wide x 0.2" Thick
【Strong Adhesive, Saves Money】Weather stripping door seal prevent heat and cold from escaping, save your heating and cooling...
As an affiliate, we earn on qualifying purchases.
As an affiliate, we earn on qualifying purchases.
Soundproofing vs. Acoustic Dampening: What You Really Need
Soundproofing and acoustic dampening serve different, yet complementary, purposes. Soundproofing is about preventing noise from escaping or entering a space — it’s a barrier, like adding mass or sealing gaps. Acoustic dampening, on the other hand, focuses on reducing echo, reverberation, and reflections inside the room. In a small closet, understanding this distinction helps you prioritize effectively. Overemphasizing soundproofing without addressing internal reflections can leave your recordings echoey and muddy, while only dampening may not contain noise leaks if the space isn’t sealed.
Why does this matter? Because the tradeoff involves cost, complexity, and practicality. Fully soundproofing a closet involves significant investments—adding mass, layers, and isolation—that may be unnecessary if your goal is clearer recordings rather than complete noise containment. Conversely, focusing solely on dampening without sealing gaps might reduce echo but won't prevent sound from escaping, which could disturb neighbors or others in your household. The key is layered approach: start with dampening to improve sound quality, then seal gaps if noise leakage is an issue. Also, consider ventilation, as sealed, soundproof spaces can trap heat and humidity, affecting both your comfort and equipment.
In essence, effective sound treatment in small spaces requires balancing internal acoustic control with external noise containment, understanding that each has different implications, costs, and benefits. Layered solutions—like foam panels combined with door seals and ventilation—are the most practical path to a functional, comfortable, and quiet closet studio.

VEVOR Portable Vocal Booth, 6.56 ft Height, Portable Recording Studio with Travel Bag, Mobile Tablet Stand, Thickened Soundproofing, Sound Isolation Booth for Echo-Free Vocals, Podcasts, Voiceovers
Say Goodbye to Echoes: Built with durable Oxford cloth and acoustic padding, this recording booth for the home...
As an affiliate, we earn on qualifying purchases.
As an affiliate, we earn on qualifying purchases.
Best Mic and Placement for a Tiny Closet Studio
In small spaces, mic placement matters more than fancy gear. Keep the mic away from reflective surfaces and direct it toward your sound source. Use a reflection filter or a portable shield to block room reflections. For vocals, position the mic about 6-12 inches from your mouth, angled slightly to avoid plosives. The goal? Capture your voice cleanly while minimizing room echo.
Why is this important? Because in tight quarters, even small changes in mic position can dramatically improve sound quality. Placing the mic too close can cause proximity effect, boosting bass, while too far away introduces more room reflections. Using a reflection filter helps absorb some of those reflections, but proper placement is key. Experiment with angles and distances to find the sweet spot that captures your voice clearly without picking up too much of the room's echo. Combining this with layered absorption—like foam panels and blankets—ensures your recordings are crisp and professional, even in a tiny closet.

Focusound Acoustic Panels 50 Pack 2"x12"x12" with 300 PCS Double-Side Adhesive - Sound Proof Pyramid Foam for Walls, Home Studio Noise Absorption & Echo Control Kit
STRESS-FREE INSTALL: NO HOLES, NO RESIDUE! - Install & Remove Stress-Free with 300 reusable adhesive squares – cleans...
As an affiliate, we earn on qualifying purchases.
As an affiliate, we earn on qualifying purchases.
Where to Place Panels, Rugs, Blankets, and Bass Traps in a Closet
Placement is everything because it directly influences how sound behaves within your space. To effectively treat your closet, identify the primary reflection points—these are the spots where sound bounces directly back to your mic or ears. Typically, these include the wall behind the mic, the ceiling directly above, and the side walls facing the sound source. Covering roughly 20-30% of these critical areas with thick panels helps absorb reflections, reducing echo and boxiness that can muddy recordings. For more ideas, see 7 best acoustic panels for home meditation rooms.
Why does this matter? Because untreated reflection points cause sound to bounce, creating comb filtering and phase issues that distort your recordings. Bass traps placed in the corners are crucial because low frequencies tend to accumulate there, causing boomy, muddy sound. Without bass trapping, your small closet can sound boomy and unbalanced, especially at lower frequencies. The tradeoff is that over-treating can deaden the room too much, making it sound unnatural. Striking a balance with placement and coverage ensures a natural yet controlled sound environment. Layered treatment—panels at reflection points, bass traps in corners, and a rug on the floor—works synergistically to create a balanced acoustic space that enhances clarity and reduces unwanted resonances.
Frequently Asked Questions
How do I soundproof a closet for recording?
Focus on sealing gaps around the door and outlets, adding acoustic panels at reflection points, and bass traps in corners. For full isolation, consider building a sealed enclosure with soundproof drywall and controlled ventilation, but layered treatment often suffices for most home setups.Where should I place acoustic panels in a closet studio?
Place panels at reflection points — behind the mic, on the side walls, and the ceiling. Cover about 20-30% of the surface area for effective echo reduction. Using bass traps in corners helps control low-frequency issues common in small rooms.Do I need bass traps in a tiny closet?
Yes. Small closets often suffer from bass buildup and standing waves. Installing bass traps in the corners can dramatically improve the sound, eliminating boominess and making vocals or instruments sound clearer and more balanced.How much wall coverage do I need for a good vocal booth?
Aim for roughly 20-30% coverage with thick panels, focusing on reflection points and corners. This strikes a balance between effective echo control and maintaining natural sound without over-treating a tiny space.Can foam panels stop noise from leaking out?
No. Foam absorbs reflections within a room but does little to block sound from escaping. For better leakage control, seal gaps and consider adding heavier barriers or soundproof doors.Conclusion
Your closet can become a surprisingly effective studio — if you treat it smartly. The key isn't just foam or sealing alone, but layering placement, absorption, and airflow. Think of it like building a tiny fortress: every piece matters.
Remember, the best soundproofing is moving your rig away from your workspace. When heat and noise are out of sight and earshot, your recordings and streams will sound way better — and you’ll enjoy the process more.